Are you planning to fit new vinyl flooring? Installing underlayment is one of the best ways to ensure underfoot stability and comfort of vinyl floorings such as sheet vinyl, vinyl tiles, and glue-down vinyl.
Plywood has some great advantages as an underlayment material; it is pretty easy to work with, structurally strong, and water-resistant. With good preparation and the right tools, you can pull off this project in a few hours.
I have installed vinyl floors in my living area, kitchen, and bathroom, and we chose to fit plywood underlayment first. So, in this article, I will share how to install plywood underlayment for vinyl flooring the right way. Anyone with some DIY skills can easily fix their underlayment.
Tools will need for Installing Plywood Underlayment For Vinyl Flooring
- Plywood panels
- Circular saw
- Self-leveling compound
- Floor scraper
- Spirit level
- Tough bristled broom and a vacuum cleaner
- Seam filler (as recommended by the manufacturer)
- pneumatic nail gun
- 5/8’’ coated or galvanized nails or screws
Step-by-Step Guide To Install Plywood Underlayment For Vinyl Flooring
Follow these steps to lay down plywood underlayment for your new vinyl floors.
Step 1: Prepare the underlayment material

At least 24 hours before you begin the project, place the plywood boards in the room where you want to install them. The plywood will acclimate to the room’s ambient temperature for ease of use.
It is best to stand the boards along their longest edge and separate them to allow adequate airflow. Be sure to examine each plywood panel for damages. Do not use damaged panels with creases, cracks, or bubbles; this will compromise the look, comfort, and stability of both the underlayment and vinyl flooring. Return damaged panels to your manufacturer for replacement.
Step 2: Prepare the subfloor
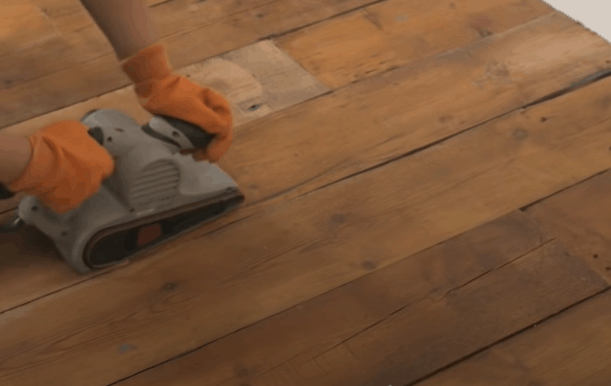
The subfloor is the existing floor where you want to install the plywood underlayment. The success of this project highly depends on how well you prepare the subfloor. Any debris caught in between the subfloor and underlayment will telegraph to the vinyl flooring.
Also, cracks and holes on the subfloor can trap moisture, making your floors prone to moisture damage in the future. These are not ideal scenarios, and you can avoid them by taking the time to repair and clean your subfloor.
Strip off all existing flooring before installing the plywood underlayment. Remove nails and scrape any residual glue and paint off the floors.
Use a suitable patching compound to repair cracks and holes on subfloors. Check for levelness using a spirit level and, if necessary, apply a self-leveling compound to repair an out-of-level floor.
Thoroughly clean your subfloor before placing underlayment material. I like to first sweep with a tough-bristled broom followed by a thorough vacuum to get rid of minuscule debris.
Step 3: Position the plywood panels on the floor
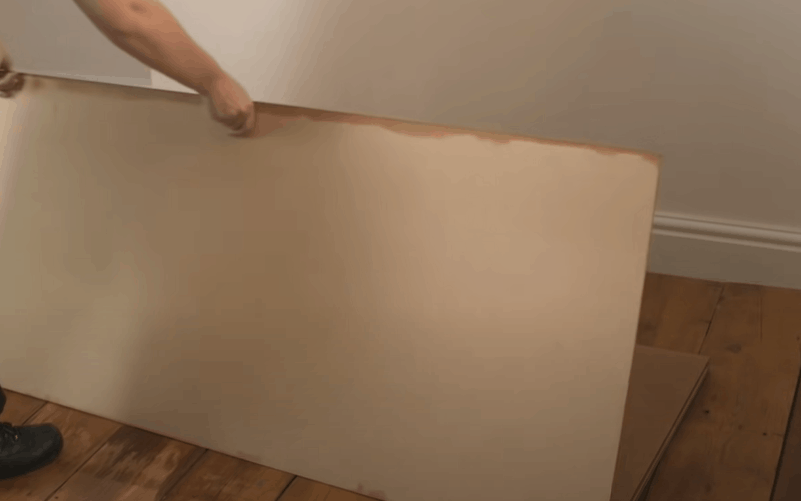
Plywood underlayment typically comes as 4×8 feet panels. First, measure the room to determine how many panels you will need to cover the floor. Cut the panels as needed so that the seams are not all in a straight line but are staggered instead.
Start by laying out the boards in the corner of the room so that you can install an entire 4×8 panel without needing to cut it. Lay the boards perpendicular to floor joists for maximum strength of the underlayment.
The smooth side of the boards should face up. Because you will be installing vinyl flooring, be sure to purchase plywood panels with a smooth and not a grained surface. Plywood with patterned grains will telegraph to the vinyl flooring.
Position the plywood boards such that the factory cut edges face each other in the field of the floor while the edges you cut yourself using a circular saw face the walls.
Ensure that the seams between two plywood panels do not seat on top of any seam on the subfloor, as this will create a weak point and compromise the floor’s stability. To do this, stagger the plywood boards to ensure a distance of at least 2’’ between the subfloor seams and plywood panel seams. Position the panels in a way that four corners never meet.
Ideally, you should butt together the factory-cut edges of each panel to the adjacent panel without leaving any expansion gap in between. But, this will depend on the manufacturer’s instructions.
You can install some plywood underlayment panels without an expansion gap between the panels. Other brands require leaving a small gap between the panels for expansion. The gap is then filled with seam filler and sanded down to be flush with the rest of the surrounding plywood panels. Follow the manufacturer’s instructions on using seam filler for plywood underlayment panels to ensure the best results.
Lay all the plywood panels needed to fill the floor and cut as necessary to accommodate doors, floor transitions, and any other obstacles on the floor. Do not drive nails through the underlayment until all the plywood panels are positioned properly.
Pro Tip: Leave a 1/8 inch gap between the plywood panels and walls to allow the underlayment to expand and contract freely with temperature changes.
Step 4: Fasten the underlayment
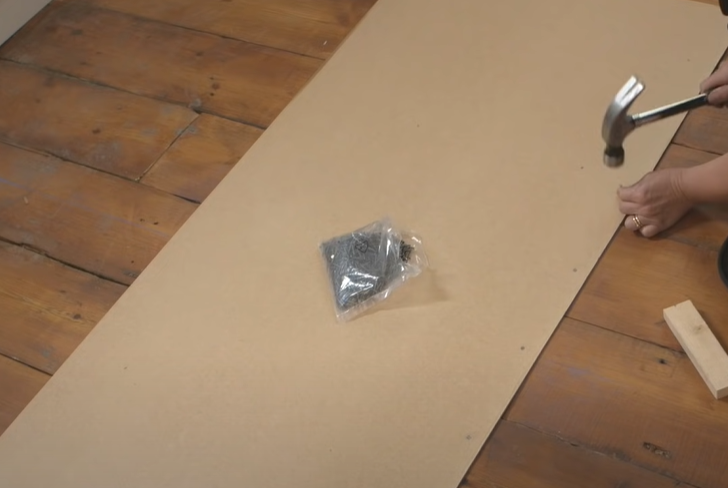
There are several tools you can use to drive nails through the underlayment. But, I strongly recommend a pneumatic nail gun that allows you to control the drive depth.
When fastening the underlayment, you want to ensure that you drive the nails deep enough but not so deep that you blow past the subfloor. Check out this video for a good demonstration of the right way to fasten underlayment to the subfloor.
In addition to using the right nail gun, you should also use the appropriate fasteners. The best fasteners are coated or galvanized nails or screws of at least 5/8’’. Don’t use extra-long nails as these will blow past the subfloor, making for a poor fastening job. Alternatively, you can use galvanized staples and fasten them using an air-powered stapling machine.
Avoid uncoated staples, nails, or screws as these are prone to rust and will eventually discolor the vinyl floor. Rosin or cement-coated nails may also rust and should be avoided too. Also, keep away from drywall screws; they are unsuitable for plywood and may cause cracking to the underlayment.
To get started, stand on the underlayment to ensure that the plywood touches the subfloor. Start by driving the fasteners through the 8-foot edge of the plywood panel in the corner of the room. Drive in the nails working from one corner toward the corner at the opposite end. Along the edge, space out the fasteners ½’’ apart and 2’’ apart on the rest of the plywood.
Return to the starting corner and drive fasteners through the 4 foot edge. Position the nails at ½’’ apart along the edge and 2’’ on the center of the underlayment.
Start at the initial corner and drive fasteners diagonally. Drive in the nails at 4’’ across the center of the underlayment as you move to the opposite corner. Return to the start corner and drive fasteners diagonally at 4’’ apart. This will be the second diagonal line.
After finishing each diagonal line of fasteners, return to the starting corner and begin another line until you make several diagonal passes across the underlayment field.
That’s it! Congratulations on installing your new plywood underlayment. You can now get ready to install beautiful vinyl flooring. Check out a few extra tips below to make your project a success.
Extended Tips
- Avoid butting the panels too tightly as this will lead to warping and buckling throughout the entire floor. Even if you don’t want to leave an expansion gap, you should aim to let the edges of the panel touch lightly. And, remember to acclimatize your panels for at least 24 hours.
- If you choose to use seam filler or your underlayment manufacturer recommends it, use the product moderately. Excessive seam filler will dry and form ridges that will telegraph through to the vinyl carpet.
- Allow seam filler to dry completely and sand it with a floor sander so that it is flush with the rest of the underlayment.
- Be careful not to install plywood underlayment on a moist or uneven subfloor. If you stand on the plywood and hear crackling sounds, that’s a sign there is still some debris on the subfloor. Unfortunately, you will have to remove the underlayment and vacuum away the debris.
- If you suspect your subfloor might have high moisture content, perform the calcium chloride test to confirm. Install a waterproof barrier before laying the underlayment if your subfloor’s moisture levels are high.
- Just like achieving an even subfloor, fastening is crucial to the success of your underlayment project. Be sure to drive fasteners ½’’ from the panel edges. Fastening too far away will cause the underlayment to be loose along the edges, which will result in the vinyl flooring coming off too soon.
Summary: How To Install Plywood Underlayment for Vinyl Flooring
Installing plywood underlayment isn’t too difficult, but small mistakes can result in big flooring failures. Watch out for the faux pas I have listed, and you will be well on your way to a successful project.
In addition to these tips, I also strongly recommend you follow manufacturer instructions on acclimatizing the plywood panels and filling the seams for the best result. Happy flooring!
My underlayment is already vinyl tiled and is unsecured in areas! How can I fix without starting over?
I already layed my vinyl tile! Now my underlayment is bubbling is there a fix?