Are you bothered by the rough edges and blemishes on your newly-purchased flooring boards? Fret not because you can work on these issues with the help of a pivotal tool called a floor sander. However, you need to know that there are different types of floor sanders that cater to different materials.
So, let’s have a thorough discussion of floor sanders that you can make use of for your home renovations or simple DIY creations. But before that, it’s crucial to know the process of floor sanding.
Table of Contents
What is floor sanding?
Floor sanding is a method that removes the rough layer of the wood floor by sanding and polishing the surface using an abrasive material. With this technique, the grain of the wood gets a smooth finish that is free from imperfections. Floor sanding also ensures there are no coarse edges that may cause accidents.
The method focuses on the damaged layer, removing them to reveal a healthier layer of wood. And of course, the process itself is important to create a smooth and flat set of floorboards, which is essential when staining a new color to complement the entire aesthetics of the room.
Aside from removing the worn-down features of the wood, it also prepares the wood for floor refinishing. Therefore, having a floor sander on your home is definitely a good investment. And don’t worry because there are lots of floor sanders available in the market to give you options.
What are the most common types of floor sanders?
From orbital sanders to edge sanders, each comes with certain functionalities that make them distinct from one other. So, take a closer look into the common types of sanders, evaluate them accordingly, and pick the right tool for your needs.
1. Orbital sanders
Our list begins with the orbital sander, an equipment that polishes a surface at a high speed. Most of these tools are very handy because of their design, which is either circular or square. Both can reach restricted areas, particularly square one, which can seamlessly reach into the corners.
In general, orbital sander follows a circular pattern when sanding the surface, hence the name. Meanwhile, there’s the random orbital floor sander, which is somehow an upgrade to the normal orbital type. Instead of the typical circular movement, it works back and forth, speeding up the sanding process.
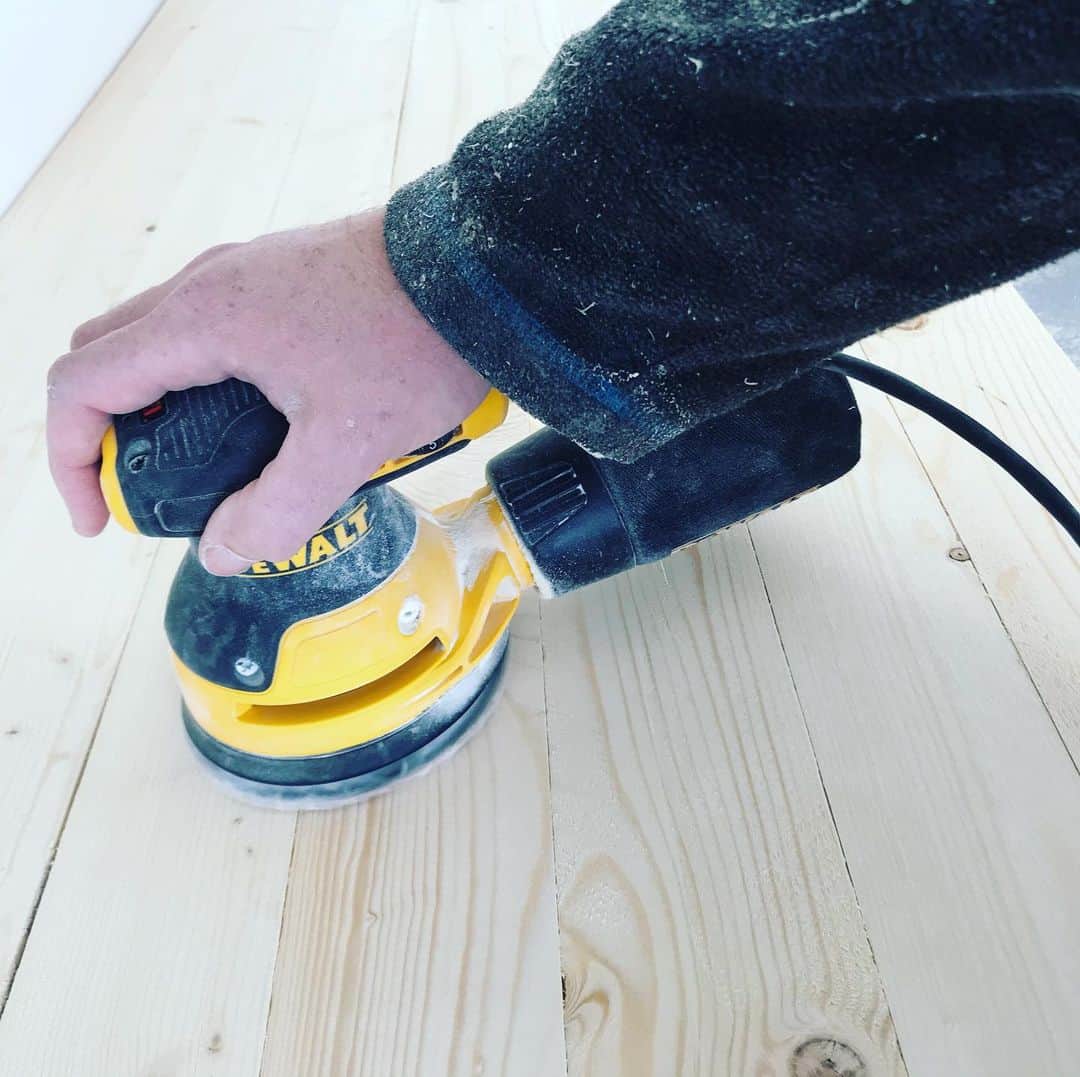
Therefore, a random orbital sander is the best choice if you want something to help you do the job quickly, especially in smaller areas. It’s also less abrasive than other floor sanders, which means lesser permanent damage on the plank in case of unintentional sanding.
Likewise, it is used to get rid of rust and paint on the surface. However, you need to take note that orbital sanders can only remove only minimal sections. In using it, you should evenly apply pressure to ensure a smooth result. Thus, if you’re looking for something bigger, the next option would be a fitting option.
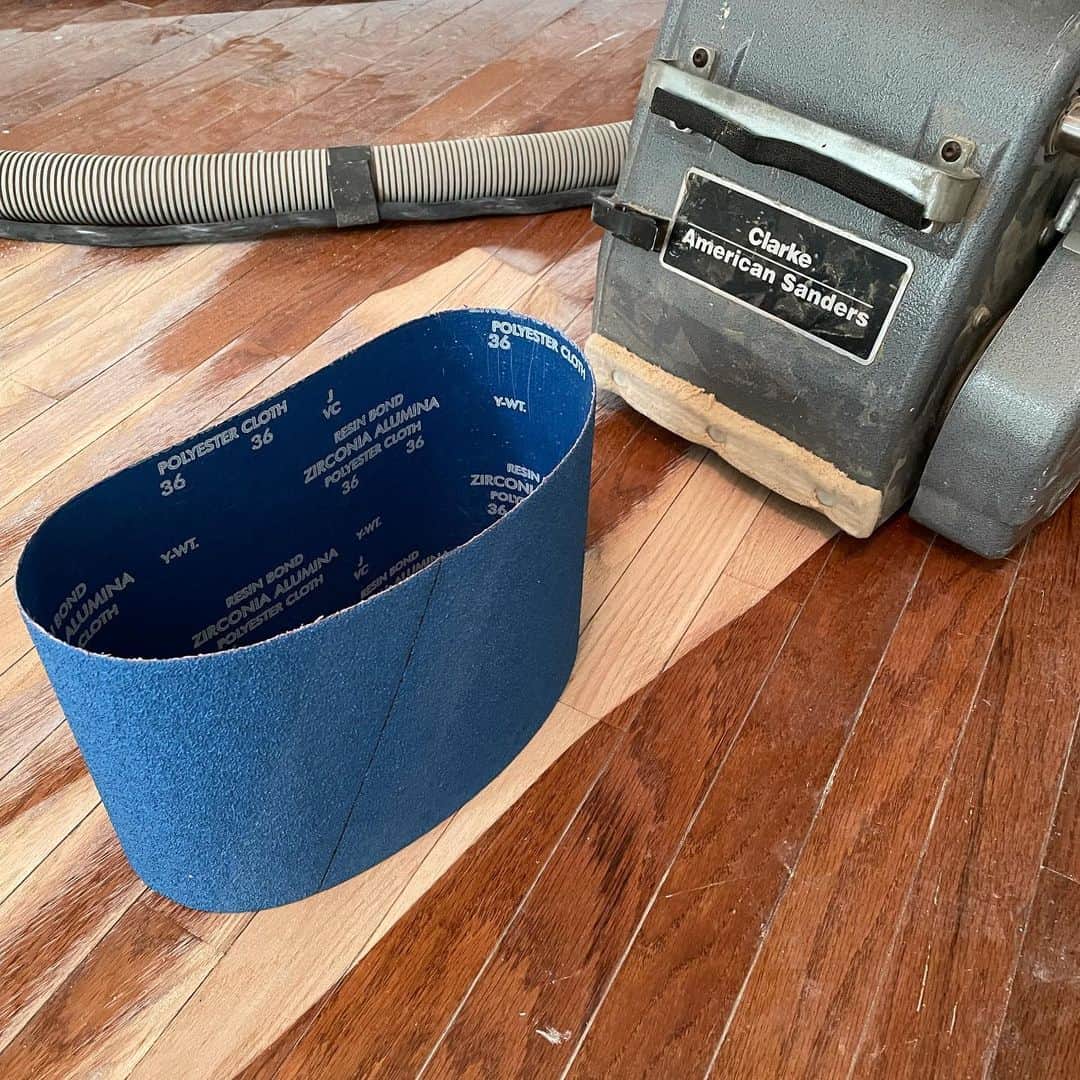
2. Drum sanders
When it comes to bigger planks of wood, drum sanders are highly recommended. These machines are designed to smoothen huge boards, either wood or plastic. Often than not, these tools are very big that they would need at least two people to handle the work.
A large drum sander typically functions like a bench machine because it makes use of different sandpaper grits and drums. The massive sanding paper belt attunes over a rotating drum. This drum then spins at a high velocity, speeding up the sanding job.
Conveniently, drum sanders have their own dust bag that acquires wood debris and fine dust. If there is excess dirt during the sanding process, make sure you vacuum them carefully to avoid unwanted mess. And because of the powerful features of a sanding drum, it is also utilized in removing stains on the planks.
Additionally, it is the most suitable choice if you want to strip off the finish of hardwood floors. However, you need to be careful in using this tool. It’s because sanding drums spin powerfully and quickly, which may cause scratches and cracks if not handled properly.
In using the equipment, it’s best if you have someone to help you out and ensure that the belt sander is positioned appropriately. If it’s your first time trying the tool, read the manual carefully before you kick off with the process. Or perhaps you can let the professionals do the job to save you stress and time.
3. Vibrating sanders
Did you know that most professionals use a vibrating sander after working with the drum sander? The reason for this one is because of the lighter properties of vibrating sanders. Instead of a rotating belt, it capitalizes on a vibrating sanding pad.
As a result, it smoothly passes across the surface to create a flatter finish with less damage to the material. In terms of dimension, the size of a vibrating sander is a bit similar to a drum sander. Plus, it encompasses a dust bag for the dirt.
4. Edge sanders
From the name itself, edge sanders are meant to refine the edges and corners of the wood planks that sit between the floor and the wall. It is also widely used to polish the edges of the table and sides of the boards through a sanding pad that follows a circular motion.
Although an edge sander functions the same as a drum sander, it could still cause problems on the surface if not managed properly. Therefore, you need to be careful in using the machine to avoid unwanted marks and even gouges on the wood.
5. Disc sanders
Moving forward, a disc sander is quite a common tool among homeowners who prefer to be hands-on with the physical work or those small-sized shops that are starting their business. It’s easy to determine this material because of its placement.
Unlike the above-mentioned sanders, this one smoothens out the surface that is already installed on the floor. It uses a buffer pad or sanding disc, which is then attached to the equipment to polish the surface. There are several grit levels for the sanding sheets to give your options.
Before we forget, disc sanders can be a challenge to handle due to their size. It’s like a big vacuum with a sanding element. So, if you’re unsure how to use it, might as well hire an expert to complete your project.
6. Sanding screens and papers
Are there minimal imperfections on the floor that can’t be handled by the big sanders? This is where sanding screens and papers kick in. These resources are highly recommended for beginners who are yet to dive into more intricate DIY projects like floor sanding and installation.
Sandpapers and sanding screens are sometimes used interchangeably, but did you know these two are different? The former only has only one side with sanding properties whereas the latter features a double-sided outline so the dust can easily be discarded through the screen.
It’s highly suggested that you have these materials on your home kit for you to conveniently work on simple jobs on your own. Meanwhile, for complex projects like the usage of big sanders like drums or vibrating sanders, hiring a professional would definitely be a good help.
What are some relevant tips and reminders when sanding the floor?
Before making your purchase, go over the important points below and save yourself from stress.
1. Pick the right floor sander.
This is the most important step of all. Know what you need and make sure that it’s the most suitable option. Since you already know the different types of sanders, it will be easy for you to select the correct sanding tool.
2. Gather the appropriate materials.
Opting for DIY work can be very fascinating. However, you need to prepare the tools in advance for a smooth process. Some of the relevant materials in sanding and installing a wood floor are goggles, dust masks, gloves, rugs, and sander, as well as a nail set, drill, hammer, pry bar, and adhesive.
3. Consider renting the tool.
If you’re tight on budget, you can actually opt for a floor sander rental. There are hardware stores that offer rentals on a daily or weekly basis. Renting a floor sander might just be the best choice, especially if you’re not inclined toward DIYs. This will give you big savings rather than buying expensive equipment.
4. Make sure to vacuum the dirt and dust.
The process of sanding can be a bit messy. Wood debris and dust can accumulate while polishing and cleaning wood. Thus, you need to bring out the vacuum and keep them close while working.
Aside from maintaining the cleanliness of the room, using a vacuum also prevents possible damage on the floor due to debris. Likewise, if there are multiple rooms to be sanded, try to complete them together to maximize your time. This also helps in completing the project efficiently.
Conclusion
Whether you are working on sanding baseboards, wood planks, or even plastics, choosing the correct type of machine is crucial. Each floor sander has its own set of characteristics. So, take your time and pick the tool/s that would be valuable to your needs.