Not only does adding a vinyl fence on your property give you a sense of privacy, but it can also prove to be a major aesthetic element of your home. So, if you’re planning on installing a vinyl fence or replacing your old fence with a fresh set of these fences, you’re at the right place!
From all the tools and materials you might require during this DIY to the step-by-step guide in detail, we’ve covered it all. If you have a sloppy property, your issue will be addressed as well. So, what are we waiting for? Let’s get started!
Table of Contents
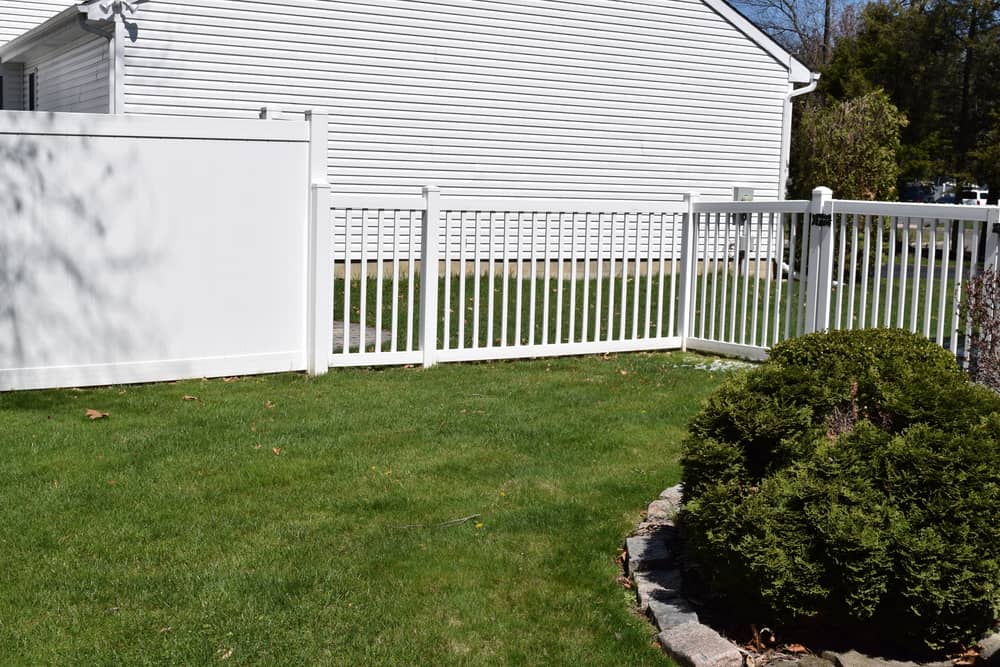
Types of Vinyl Fence
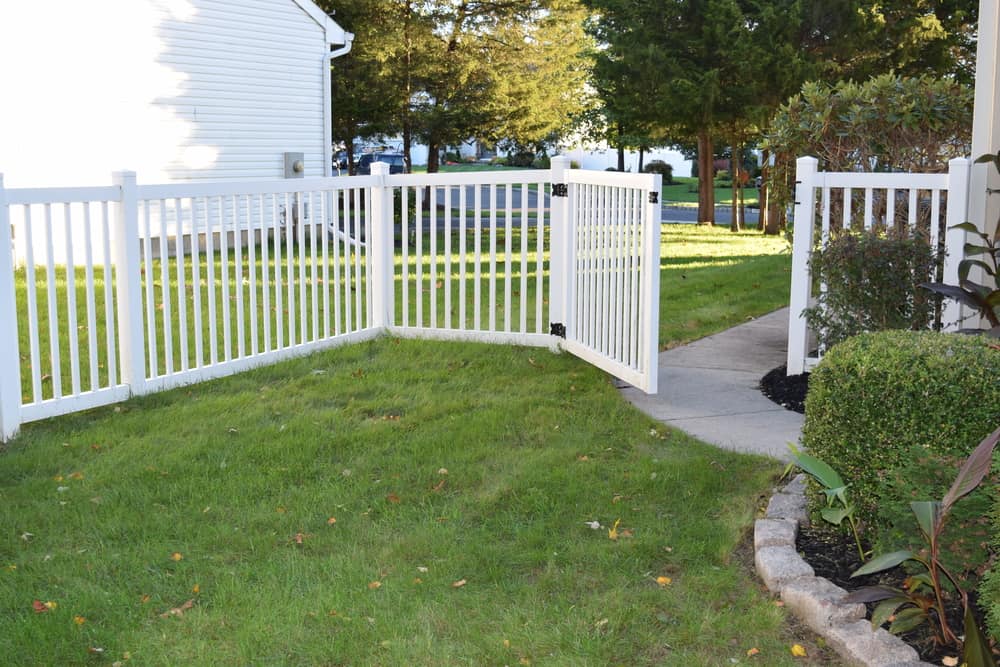
Before you order and install vinyl fences around your property, it is best to know the options available for you to choose from. While there are many other designs, heights, and styles of vinyl fences, the below-mentioned three are the best options for home fencing purposes.
1. Privacy fences
As the name suggests, privacy fences are for you if you’re in search of fencing that provides you with utmost privacy. This type of fencing has no gaps in between and comes in different heights for you to choose from.
2. Semi-private fences
A bit of privacy and a bit of air circulation – if that’s your goal, semi-private vinyl fencing is perfect for you. These fencings offer a small gap in between, thus, giving just the right amount of privacy.
3. Picket fences
If you’re in it for aesthetic purposes, picket fences look absolutely classic and stunning. You cannot go wrong with picket fences if you want to delineate the boundary and yet want to flaunt your property.
Tools and Material Required for installing vinyl fence
Now that you might have decided what type of fencing you want to fence your home with, let’s have a detailed look at what tools and materials you might require to do this project on your own.
| Stakes | Vinyl fence sets and accessories |
| Concrete mix and mixer | String |
| Power augur | Hammer |
| Level | Cutting and drilling tools (if necessary) |
| String | Gravel |
| Trowel | Tape measure |
Pre-installation Measures
You must take care of certain major things before you move on to the actual installation process. For your ease, we’ve listed them below.
1. Consult with your neighbor
Though your fence will fall under your property, you might need to inform your neighbors beforehand.
2. Verify the property line
Confirm your property line and check the deed to see if you have any design limitations imposed on your property before moving forward.
3. Make sure you don’t hit any underground utilities
You don’t want to hit any utility line underneath while digging for the posts, do you? So, make sure you contact local providers regarding all your utilities and have them flag the spots before you start the installation procedure.
4. Calculate the number of materials required
Now, the next step is to buy or order your fencing. Measure your property and calculate the number of posts and panels. Or, if it helps, involve your supplier during this planning phase to make sure there is no room for errors.
5. Plan where to dump the dirt
Many homeowners don’t plan this beforehand and end up panicking once their garden starts to look horrendous.
Plenty of dirt and stones will be excavated out while digging for posts. Many choose to reuse the dirt and discard the stones. If you plan the same, make a plan to where to dump the stones.
6. Get a permit
Depending upon your local or community code, you might need to apply for a building permit. So, once you have everything ready to begin, get a permit, and start on the DIY.
Step-by-step Guide To Install Vinyl Fence
By following the 6 steps mentioned below, you’ll be able to fence your property beautifully. Let’s begin!
1. Mark the layout
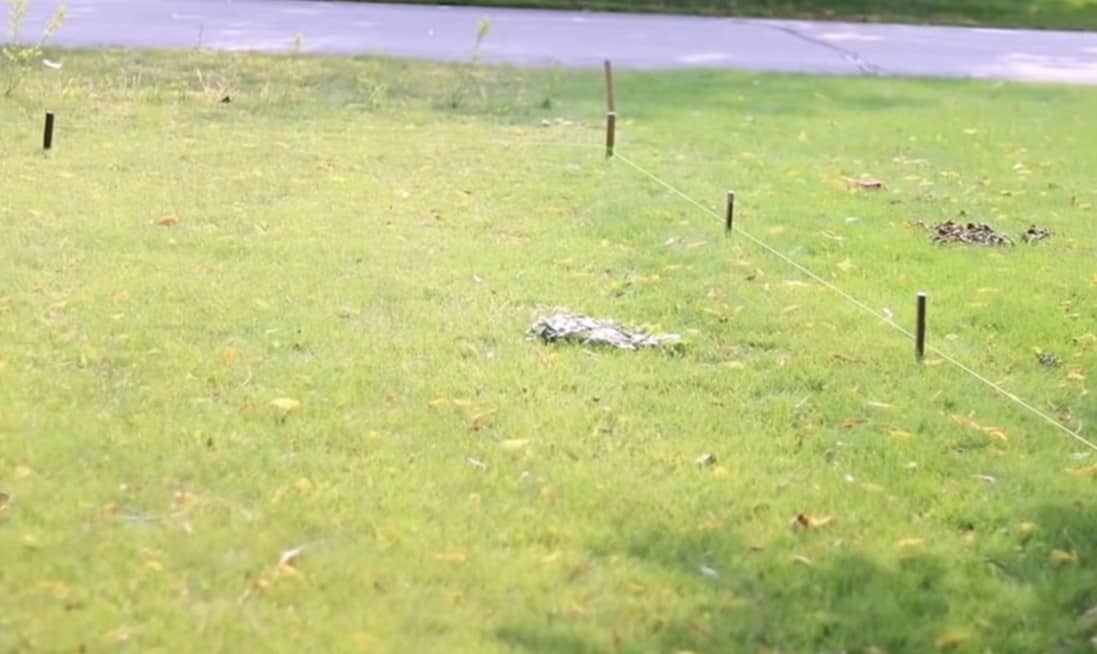
If you have already removed the existing fence, start by marking the locations for the vinyl posts. Firstly, string line the perimeter such that your vinyl fencing will end up nice and straight.
Now, mark the end and corner posts by staking and stake the ground every panel width’s apart in between. Make sure your stakes are flush the string line such that every post will be in a straight line.
2. Dig holes for line posts
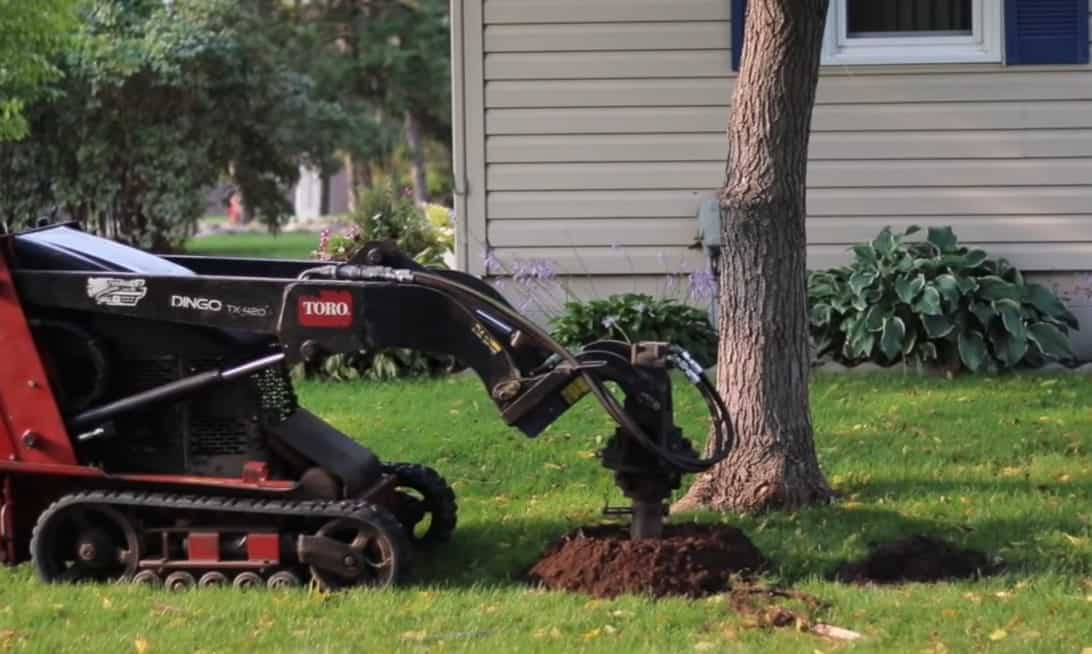
Onto the most daunting step of the project – digging the holes. Manually, doing this can take a lot of your time and effort. So, we’d recommend you to get a power augur for rent for a day if you don’t have one already. Doing so can finish days worth of work in just a day.
The depth of the hole depends upon your vinyl post lengths. Generally, it is advised to dig holes of depths that are 1/3 of vinyl posts’ lengths. Make sure that the lower notch of the post is just a few inches above the ground.
And, never make the mistake of digging shallow holes as the strength of your fence comes from the posts fixed on deep cement-filled holes.
3. Fix the line posts with cement

If you have a cement mixer, it would be a life-saver. But if you have fun mixing the cement, like many do, including me, you cannot pull the task even without a mixer.
It is generally recommended to fix the end and corner holes first. Moreover, fix the post as you go on and not all at once, as a small measurement problem might amplify to be a big issue if you fix all the posts in haste early on.
However, if you choose to do it all at once, you must make sure that the posts and panels fit together. To do so, cut a 2 X 4 to the length required between the two consecutive vinyl posts and use it to measure the distance while fixing the posts.
Add 6 inches of gravel to drain water from the holes and then pour the concrete mixture. Dip the post onto the mixture and align the depth using the string line. Make sure you use a level to ensure that the posts are fixed straight on the mixture.
Now, you can clamp some braces onto the posts until the concrete mix sets. Drill the braces onto the stakes on the ground to secure the structure.
For installing picket fences, drive anchor pipes onto the ground using a sledgehammer and then insert posts sleeves before moving on to the next step.
4. Ensure the distances and heights of the line posts are proper

Before the concrete sets perfectly, measure the distance between two line posts using the previously cut 2 X 4.
Also, stretch a string taut from two end posts and align the heights of the line posts accordingly. Stay attentive for this step, as if you wait too long for this process, you will not be able to drive down the posts on set concrete.
5. Cut fence sections, if necessary
If necessary, cut the pickets for areas where they’ll not fit as it is. You might need cutting tools for this purpose.
6. Assemble the panels
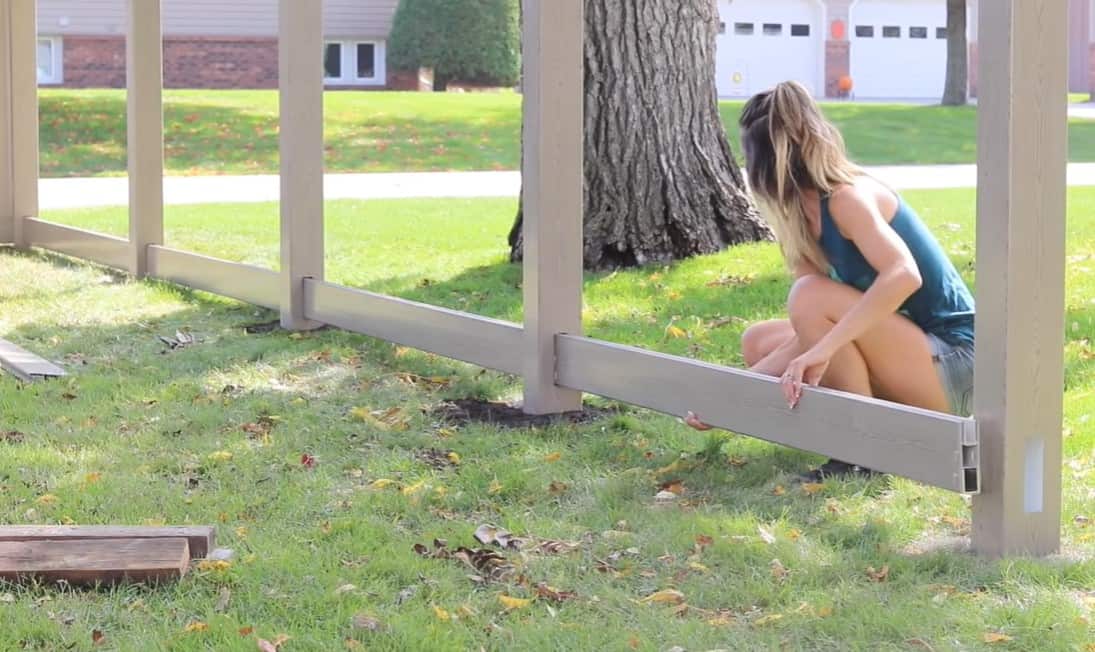
Start by installing the bottom rail first followed by attaching C channel brackets on the posts. Then, insert the pickets one at a time and finish it off by adding the top rail. Once you’re done assembling the panels, attach post caps on the posts and you’re done.
How To Install Gates?
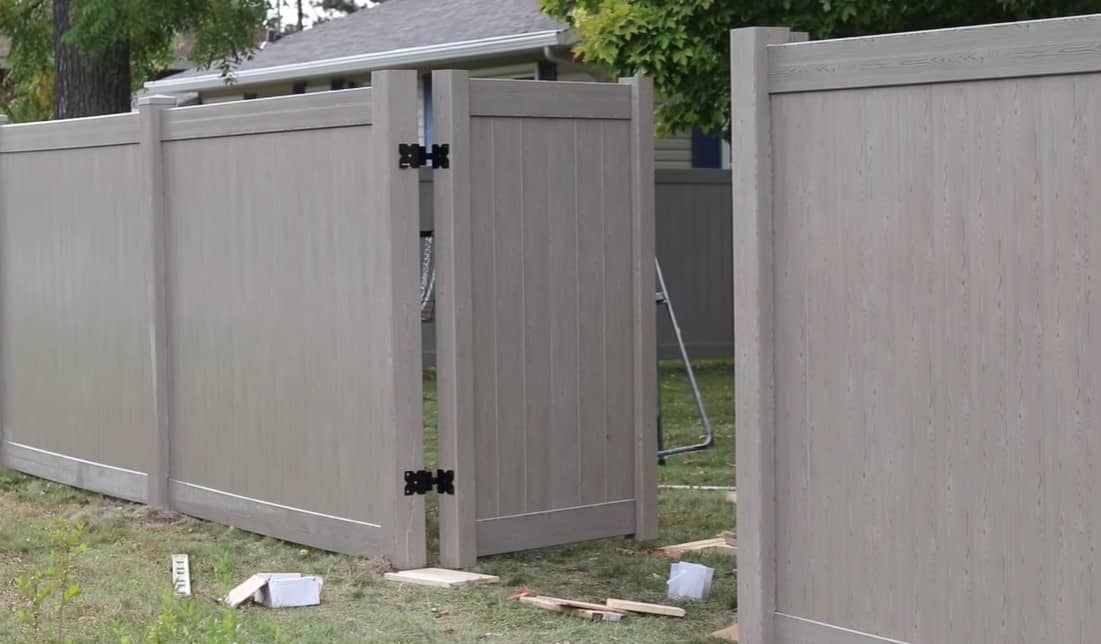
Once all your posts are in place, installing a gate is not a being deal. Insert heavy-duty metal beam post inserts inside line posts lying on the sides of the gate. Do this while the concrete is still wet such that you can easily hammer these deep into the concrete.
These metal inserts are added to make sure that the post can withstand forces exerted on them while opening and closing. Install the hinges and a latch, and you’re done!
How To Deal With Slopes?
If you have a steep sloping property to fence, take advice from your supplier regarding the type of vinyl fence that best suits the purpose. While fencing slopes, we shall keep the rails parallel to the ground while the pickets are vertically added, not at an angle.
You might need to elongate the notches on the line posts and cut the rails at an angle in order to fix them together. Then, cut the boards at an angle such that they nest on top of the rail.
Likewise, once you’re clicked all the vertical boards in place, cut the top portion parallel to the ground. And cut the top rail at an angle as well to fit leveled on top.
Summary
Installing vinyl fencing might sound scary if you don’t have any experience. Nevertheless, with proper guidance and a set of tools and materials, you can definitely accomplish it.
For instance, by following the above-mentioned pre-installation measures and the step-by-step guide, you can definitely fence your property with ease. For more information, contact experts, suppliers, or leave a comment down below. We’re at your service!
Thanks so much for the step by step guide on how to install fencing. My sister has been wanting to enclose her backyard with a fence so she can start a garden. She doesn’t think she can do it herself though so she’s been looking into calling some professionals to come to install it for her.
I am moving to a house with several hills. I want to build vinyl fences but am having difficulty doing it. I appreciate how you mentioned fencing slopes; we’ll keep the rails parallel to the ground while adding the pickets vertically, not at an angle. I believe that hiring a vinyl fence installation specialist to assist me in installing it is the best option.
This is a great article! This is helpful to anyone who will do it on their own. Installing a fence is not easy, a lot of people still can’t do it even with a guide and also it will take a lot of their time. Just like me, I don’t have much time to do it by myself so I decided to inquire and contact experts near my area.
Thank you for pointing out that you should talk to your neighbor before building your fence. We’ve been wanting to build a fence for a while now. We decided to make the jump, so we’ll be sure to talk to our neighbors before we put it up.
It was a useful reminder when you told us to verify our property lines first by checking the deed before we install our fences to avoid any disputes with the neighbors. I need new fences for my house soon since my old ones got ruined badly by the storm last week and I can’t go on for much longer without them. I’ll keep this in mind and do as you said while I look for a fence contractor to hire for my vinyl fencing installation soon.