Are you looking to get rid of your old and dingy vinyl tiles? Self-adhesive or peel and stick tiles are relatively easy to install if your subfloor doesn’t require too much preparation. When you want to remove peel and stick tile, it is a different ball game altogether. These tiles can be difficult to take out, especially if you have had them for many years and they are firmly stuck to the subfloor.
That doesn’t mean that removing peel and stick vinyl flooring is impossible. The trick is in using the right tools and practicing a bit of patience. In this article, I will share some great tips I learned from the first-hand experience when removing self-adhesive tiles in my kitchen. Keep reading to find out more!
Table of Contents
You will need:
- Small floor scraper
- Pry bar
- Hammer
- Hairdryer
Step-By-Step Guide To Remove Peel and Stick Tile
Follow these steps to get rid of stubborn peel and stick tiles and remove the glue on the floor.
Step 1: Warm the first tile
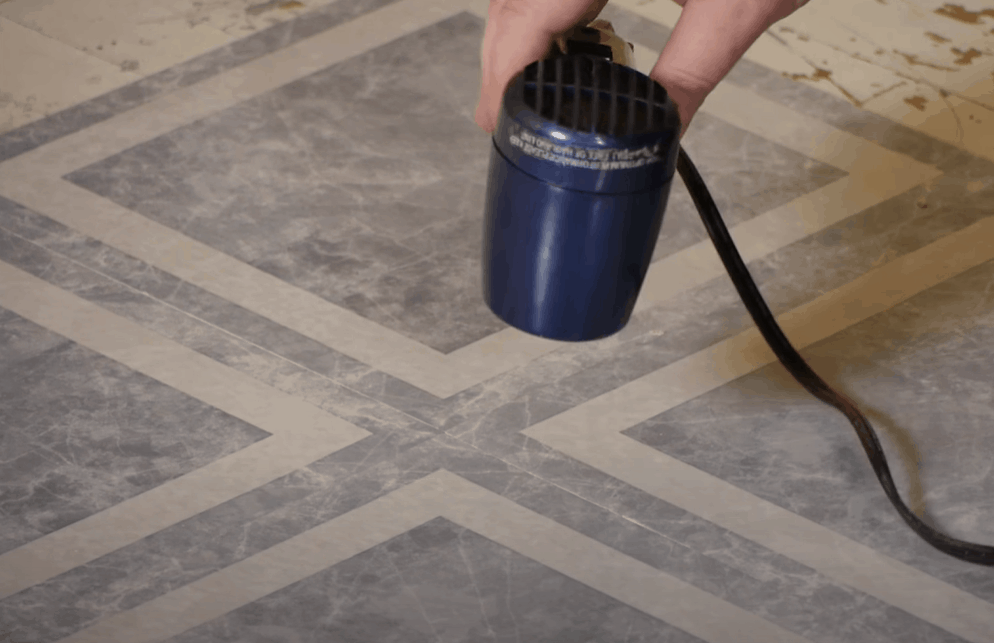
The secret to easily removing peel and stick tiles is to apply some heat to the tiles to weaken the adhesive. The first time I tried to remove my tiles, I went at it with only a floor scraper and hammer, but this method only helped break up each vinyl tile bit by bit and was time-consuming.
The most efficient way to remove self-adhesive tiles is to lift each tile as a whole and separate it from the subfloor. To do this, you will need to apply some heat to melt the glue holding the tile to the subfloor.
I have found a hairdryer to be the safest way to heat self-adhesive vinyl tiles. It is possible to use alternative heat sources such as a heat gun or an iron box. But, you must be extra-careful as these can easily burn the tiles, destroy a plywood subfloor, or create a fire hazard.
Put your hairdryer on the highest setting and hold it an inch away from the tile. Move the hairdryer around for about 60 seconds to heat the tile adequately.
Pro Tip: Holding the dryer closer warms the tile faster, overheating the dryer as the hot air circles back into the motor. As such, it is advisable to position the dryer at least one inch away from the tile to diffuse the heat.
Step 2: Lift the tile
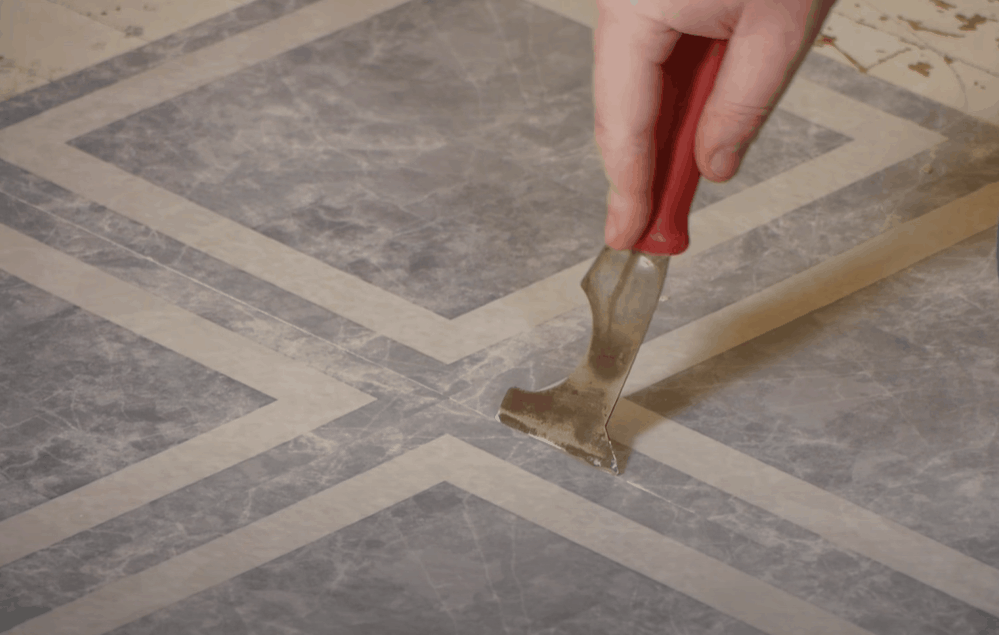
Now that you have applied some heat, the tile should be easier to remove. Start at the corner of the heated tile and use a hammer and the floor scraper to cut into the tile’s seam. Simply place the scrapper’s blade along the seam of the tile, and strike the floor scraper with a hammer to break the seam.
With the seam broken, you can easily insert a pry bar to lift the tile. Be very careful as you lift the tile with the pry bar; remember, the goal is to lift the tile as a whole piece and avoid breaking it.
Use moderate strength as you pry up the tile. Instead of lifting it straight, pry it at a 30-degree angle until you are satisfied that the tile has lifted enough for you to slip your hands underneath the tile.
Prying the tile up straight is a sure way to cause it to break. Removing the smaller piece that remains bound to the floor can be annoying and time-consuming when self-adhesive tile breaks. So, you want to do everything possible to remove the tile as a whole piece.
Step 3: Pull the tile
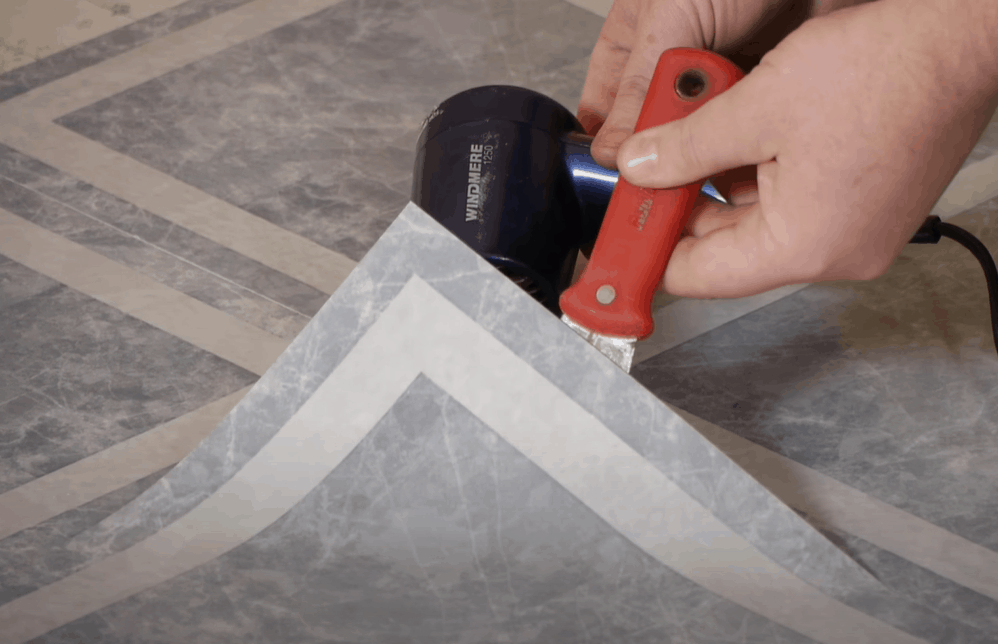
Lift the tile enough for your fingers to slip underneath. Then pull the tile toward you to create enough tension to break the bond between the adhesive and subfloor.
I like the idea of pulling the tile toward your body, as you are almost guaranteed that it will not break if you do it firmly but gently. All you are doing is applying tension and agitating the adhesive until the tile comes loose, so you can easily remove it as a whole piece.
Step 4: Repeat to remove the other tiles

If you want to remove more than one tile, repeat the heat, pry, and pull method, I have outlined in the first three steps above.
In my experience, how well you remove that first tile will have a bearing on the adjacent tiles. Try to make the removal process as clean as possible to pave the way for the rest of the tiles.
When removing just one tile for replacement, you want to be extra careful not to tamper with the adjacent tiles. Try as much as possible to remove the tile you want to replace without breaking it.
That’s all there is to removing a peel and stick tile from your subfloor! Check out the extra tips I have included to help make this project a success.
Extended Tips
- The adhesive on vinyl peel and stick tiles strengthens over time. If your vinyl flooring is ten years old or more, a hairdryer might not be the most efficient way to weaken the adhesive. A better, faster option would be to use a heat gun.
- If you remove the entire floor, the adhesive that remains behind will make the subfloor super sticky. Depending on your next project, you can make the subfloor less sticky, or you can choose to remove the adhesive completely.
- The adhesive left on the subfloor will not interfere with the floating planks or tiles when installing floating vinyl floors. In this case, there is no need to remove the sticky adhesive.
- It is best to remove the adhesive if installing new peel and stick vinyl tile or any glue-down flooring. Sprinkling sawdust and or baking soda will make the subfloor less sticky without you needing to scrape off the adhesive.
- To remove the residue adhesive completely, start with a mild solution such as a soap-based cleaner or a household degreaser. If this doesn’t work, you can try something stronger such as a solvent containing denatured alcohol or mineral spirit. For very stubborn residue adhesive, try a citrus stripper or an acetone solvent, which is a strong cleaner and can damage the subfloor’s finishing if used excessively.
Summary: How To Remove Peel and Stick Tile
Peel and stick vinyl tiles are an affordable way to take your floors from drab to fab. With proper care and maintenance, they can serve you for many years.
The only downside is these tiles can be difficult to remove, especially if you have had them for a long time, as the adhesive strengthens over time.
That said, with the right tools, some elbow grease, and a whole lot of patience, you can eventually remove peel and stick tile, a piece at a time.
The trick here is to heat the tile and work to remove it as a whole piece; a bit of heat really goes a long way in removing the hassle out of this project.
Many thanks for that! You were absolutely right about using a hair dryer. It made a huge difference in me being able to remove old kitchen tiles.